Support complet : la plupart des produits sont conçus par nos soins !

Email: store@creasol.it - Telegram: CreasolTech - Whatsapp: +393283730010

Les commandes sont expédiées sous 1 jour ouvrable

Courrier prioritaire : rapide et pas cher - C

Garantie 24 mois, retour/remboursement facile

Contactez-nous avant de retourner les produits !

ouvre-porte de garage ou portail intelligent Wi-Fi

ouvre-porte de garage ou portail intelligent Wi-Fi

0 Review(s) 

Ouvre-porte intelligent WiFi 2,4 GHz permettant d'ouvrir et de fermer votre porte de garage, votre portail ou votre barrière de circulation via smartphone, Android Auto, Google Home et Alexa.

OEM
smartopener
28,06 €
TTC Expédié en 1 jour ouvré
Quantité
Derniers articles en stock

  Support complet : la plupart des produits sont conçus par nos soins !

Email: store@creasol.it - Telegram: CreasolTech - Whatsapp: +393283730010

  Les commandes sont expédiées sous 1 jour ouvrable

Courrier prioritaire : rapide et pas cher - C

  Garantie 24 mois, retour/remboursement facile

Contactez-nous avant de retourner les produits !

Gate and garage door smart opener, wifi, cloud
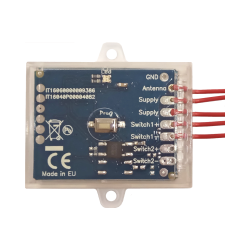
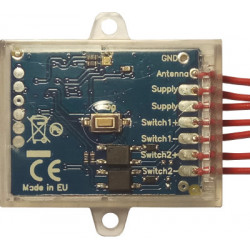
Dispositif WiFi très compact, 39x39x23mm, équipé d'un capteur magnétique pour surveiller l'état fermé et d'un contact sec (relais) activé pendant 0,5s pour ouvrir/fermer votre porte de garage, votre portail ou votre barrière de circulation (désormais appelée « automatisation »).

Le dispositif d'ouverture intelligent doit être connecté au réseau WiFi domestique : le smartphone peut alors ouvrir/fermer l'automatisation à la fois via le réseau WiFi interne et via l'accès Internet (cloud) : il est ainsi possible de gérer l'automatisation à distance, en dehors de la zone de couverture WiFi./p>

Pas de frais liés au cloud, pas de frais annuels.

Installation

Soyez prudent avec l'électricité. Toutes les interventions doivent être effectuées par des techniciens !

  1. Retirez l'alimentation secteur (110-230V) du système.
  2. Choisissez un emplacement pour l'appareil où le signal WiFi (2,4 GHz) est suffisamment fort.
  3. Il est possible (mais recommandé) de connecter le capteur magnétique aux borniers S1 et S2. Si nécessaire, un câble supplémentaire peut être ajouté pour atteindre la position fermée du capteur. Le capteur magnétique se compose de deux parties : un aimant à installer sur la partie mobile du système d'automatisation et une partie active, avec deux fils, à installer sur la partie fixe du système afin qu'elle s'apparie avec l'aimant uniquement lorsque le système est fermé. En position fermée, l'aimant et le capteur doivent être parfaitement alignés, avec un écart maximal de 1 cm.
  4. Connectez L1 et L2 au bouton-poussoir utilisé pour ouvrir/fermer l'automatisme, ou à l'entrée correspondante sur la carte électronique de commande.les moteurs.
  5. Raccordez le 110-230 Vca aux bornes L et N.
  6. Activez l'alimentation secteur.
  7. Appuyez sur le BOUTON de l'appareil et relâchez-le pour activer le relais L1/L2 et vérifiez que l'automatisation s'ouvre/se ferme correctement.

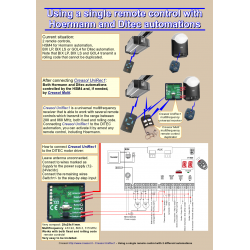
Désormais, l'automatisation peut être contrôlée par smartphone et par les systèmes domotiques.

Contrôler l'ouvre-porte intelligent via l'application Smartlife ou Tuya sur smartphone

  1. Sur votre smartphone, activez le Wi-Fi et le Bluetooth, puis installez l'application « SmartLife » ou « Tuya » (elles sont équivalentes !) depuis le Play Store ou l'Apple Store, puis lancez l'application, enregistrez un nouveau compte (si vous n'en avez pas) ou connectez-vous avec votre nom d'utilisateur et votre mot de passe existants.
  2. Une fois connecté, appuyez sur + icône en haut à droite pour ajouter le dispositif d'ouverture intelligent
  3. Appuyez sur le BOUTON de l'ouvre-porte intelligent et maintenez-le enfoncé pendant au moins 10 secondes : une nouvelle icône « Porte de garage intelligente » apparaîtra à l'écran dans quelques secondes : sélectionnez le réseau Wi-Fi auquel vous connecter et indiquez le mot de passe correspondant.
  4. En appuyant longuement sur l'écran, il est possible d'ajouter un widget SmartLife ou Tuya : dans ce cas, il est possible d'activer l'ouvre-porte intelligent d'un simple clic, sans avoir besoin d'ouvrir l'application.

Contrôle de l'ouvre-porte intelligent via Android Auto

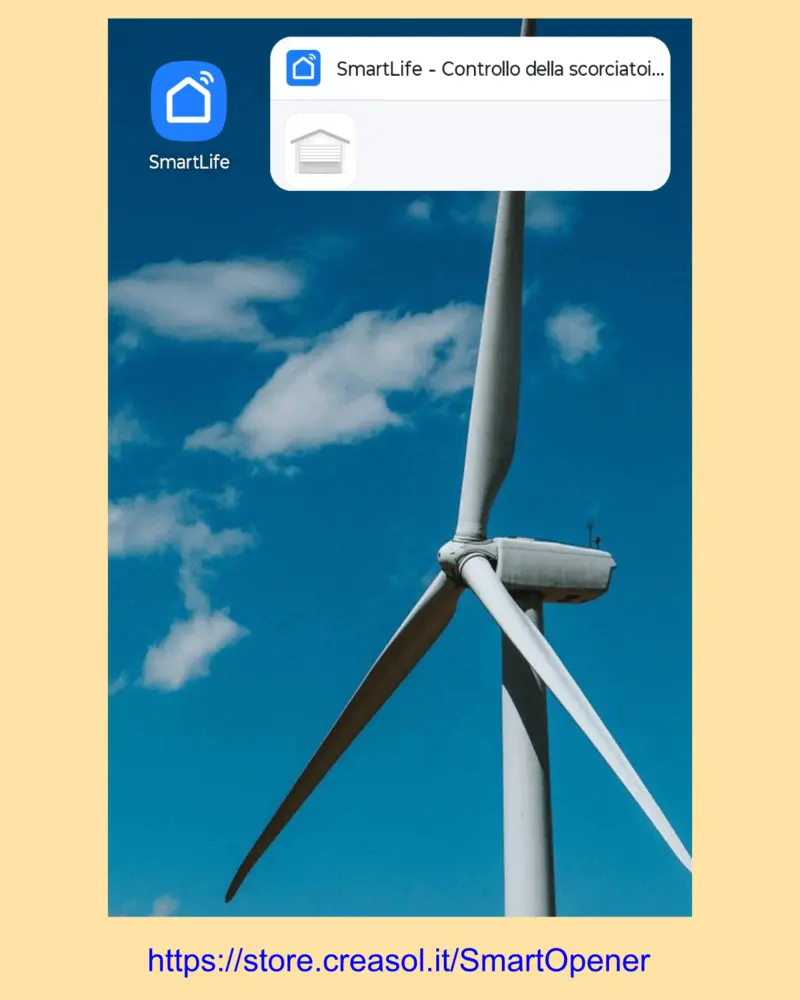
Sur l'application SmartLife, créez une scène pour ouvrir l'automatisation (portail, porte de garage ou barrière de circulation).

Une fois le smartphone connecté au véhicule, il est possible d'appuyer sur l'icône Applications -> SmartLife -> Scènepour ouvrir l'automatisation.

Bien sûr, il est possible d'installer davantage de systèmes d'ouverture intelligents pour actionner différents dispositifs automatisés, par exemple la porte de garage de votre maison, la barrière de circulation au travail, etc.

Contrôle de l'ouvre-porte intelligent par Domoticz

Utilisation du plugin https://github.com/lacha07/domoticz-tuya-cloud Il est possible de s'inscrire au cloud Tuya, d'accéder à l'ouvre-porte intelligent afin qu'il puisse être piloté par Domoticz via le navigateur (sur PC ou smartphone) et l'application.

Suivez les instructions du lien ci-dessus pour vous inscrire à l'API Tuya.

Contrôler l'ouvre-porte intelligent via Home Assistant

Installez l'intégration Tuya, inscrivez-vous au cloud Tuya pour obtenir une clé API, puis vous pourrez accéder aux ouvre-portes intelligents depuis Home Assistant.

Foire aux questions

Le capteur magnétique est-il obligatoire ?

Non, il est possible d'éviter l'installation du capteur magnétique : dans ce cas, il faut désactiver les notifications relatives à l'état ouvert dans l'application SmartLife/Tuya, afin d'éviter les avertissements concernant l'état ouvert du système domotique.

Puis-je installer le dispositif d'ouverture intelligent dans un boîtier pour rail DIN ?

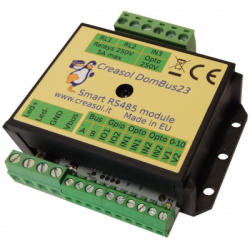
Oui, il a un plastique support pour fixation sur un rail DIN, occupant 2,5 modules (43 mm).


Smart-Home Creasol DomBus modules for Domoticz, Home Assistant, Node-RED, OpenHAB, ...

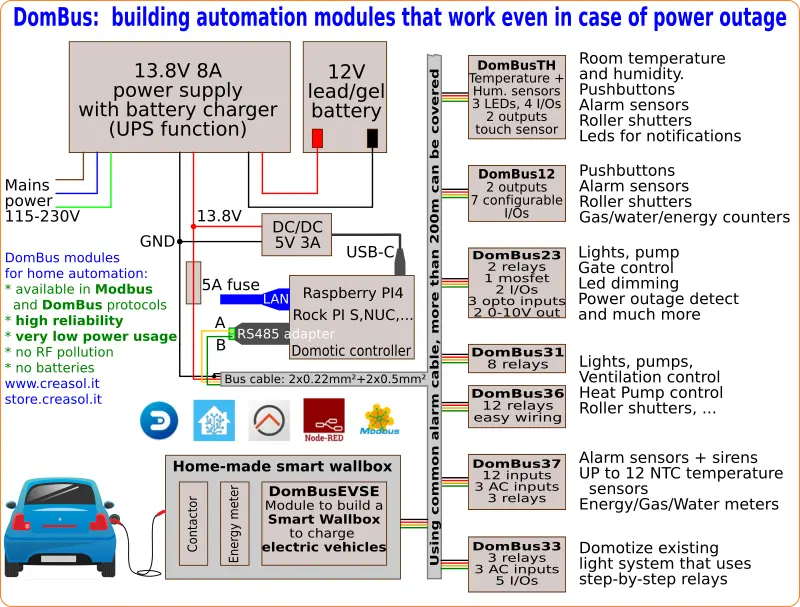
The following video shows a presentation of some domotic modules designed and produced in Italy by Creasol to make a reliable, easy and power-optimized home automation system.


The next video shows our Smart EVSE module that can be used to charge the electric car by using only solar power, or adding 25/50/75/100% of available power from the electrical grid.

Our industrial and home automation modules are designed to be

  • very low power (around 10mW with relays OFF)
  • reliable (no disconnections)
  • bus connected (no radiofrequency interference, no battery to replace).

Modules are available in two version:

  1. with DomBus proprietary protocol, working with Domoticz only
  2. with Modbus standard protocol, working with Home Assistant, OpenHAB, Node-RED
Home automation system using DomBus modules

Store website - Information website

For our products we can offer FULL SUPPORT and CUSTOMIZATION: please contact us by Email or Telegram

DomBusEVSE - EVSE module to build a Smart Wallbox / EV charging station

DomBusEVSE smart EVSE module to make a Smart Wallbox EV Charging station 
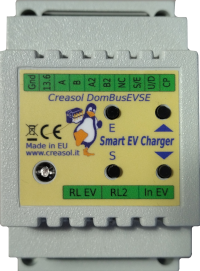
Complete solution to make a Smart EVSE, charging the electric vehicle using only energy from renewable source (photovoltaic, wind, ...), or adding 25-50-75-100% of available power from the grid.

  • Single-phase and three-phases, up to 36A (8kW or 22kW)
  • Needs external contactor, RCCB (protection) and EV cable
  • Optional power meter to measure charging power, energy, voltage and power factor
  • Optional power meter to measure the power usage from the grid (not needed if already exists)
  • Two max grid power thresholds can be programmed: for example, in Italy who have 6kW contractual power can drain from the grid Max (6* 1.27)=7.6kW for max 90 minutes followed by (6* 1.1)=6.6kW for another 90 minutes. The module can use ALL available power when programmed to charge at 100%.
  • Works without the domotic controller (stand-alone mode), and can also work with charging current set by the domotic controller (managed mode)

DomBusTH - Compact board to be placed on a blank cover, with temperature and humidity sensor and RGW LEDs

DomBusTH domotic board with temperature and humidity sensor, 3 LEDs, 6 I/O 
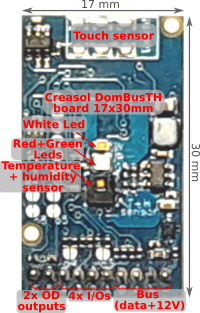
Compact board, 32x17mm, to be installed on blank cover with a 4mm hole in the middle, to exchange air for the relative humidity sensor. It can be installed in every room to monitor temperature and humidity, check alarm sensors, control blind motor UP/DOWN, send notifications (using red and green leds) and activate white led in case of power outage.

Includes:

  • temperature and relative humidity sensor
  • red, green and white LEDs
  • 4 I/Os configurable as analog or digital inputs, pushbuttons, counters (water, gas, S0 energy, ...), NTC temperature and ultrasonic distance sensors
  • 2 ports are configured by default as open-drain output and can drive up to 200mA led strip (with dimming function) or can be connected to the external module DomRelay2 to control 2 relays; they can also be configured as analog/digital inputs, pushbuttons and distance sensors.

DomBus12 - Compact domotic module with 9 I/Os

DomBus12 domotic module with 9 I/O 
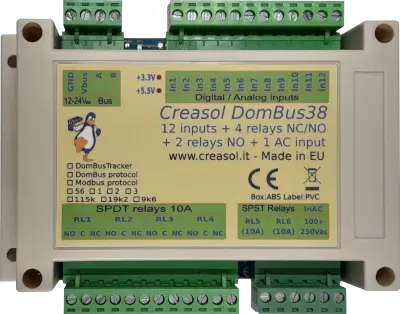
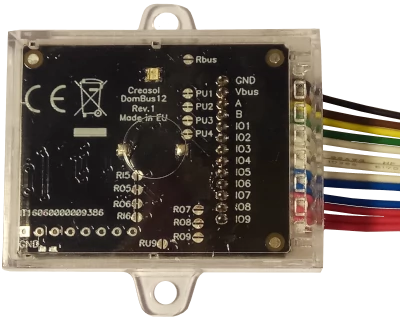
Very compact, versatile and cost-effective module with 9 ports. Each port can be configured by software as:

  • analog/digital inputs
  • pushbutton and UP/DOWN pushbutton
  • counters (water, gas, S0 energy, ...)
  • NTC temperature and ultrasonic distance sensors
  • 2 ports are configured by default as open-drain output and can drive up to 200mA led strip (with dimming function) or can be connected to the external module DomRelay2 to control 2 relays.

DomBus21 - Power optimized module with 3 High Power latching relays, 1 AC input and 4 low voltage inputs

DomBus21 module with 3 high power latching relays 
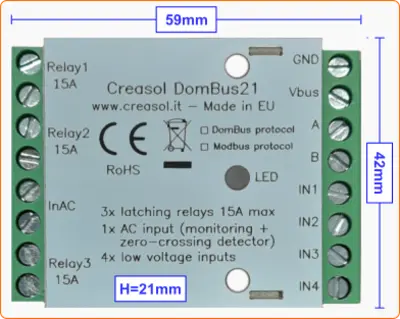
Very low power consumption module designed to enable up to 3 high power loads, up to 15A (3kW).

  • 3x high power latching relays SPST 15A: latching relay consumes nothing when ON
  • 1x 230V AC opto-isolated input used as power outage detector, and also as zero-crossing detector to permit switching relays On/Off minimizing in-rush current (for capacitive loads) and overvoltage (for inductive loads)
  • 4x low voltage inputs, that can be connected to pushbuttons, switches, meters with pulsed output, NTC temperature sensors, ...

DomBus23 - Domotic module with many functions

DomBus23 domotic module with many functions 
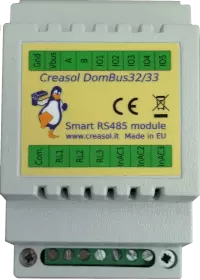
Versatile module designed to control gate or garage door.

  • 2x relays SPST 5A
  • 1x 10A 30V mosfet (led stripe dimming)
  • 2x 0-10V analog output: each one can be configured as open-drain output to control external relay
  • 2x I/O lines, configurable as analog/digital inputs, temperature/distance sensor, counter, ...
  • 2x low voltage AC/DC opto-isolated inputs, 9-40V
  • 1x 230V AC opto-isolated input

DomBus31 - Domotic module with 8 relays

DomBus31 domotic module with 8 relay outputs 
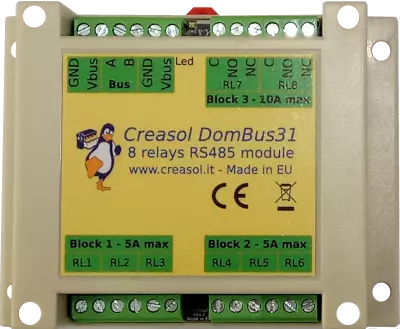
DIN rail low profile module, with 8 relays and very low power consumption:

  • 6x relays SPST 5A
  • 2x relays STDT 10A
  • Only 10mW power consumption with all relays OFF
  • Only 500mW power consumption with all 8 relays ON !!

DomBus32 - Domotic module with 3 relays

DomBus32 domotic module with 3 relay outputs 
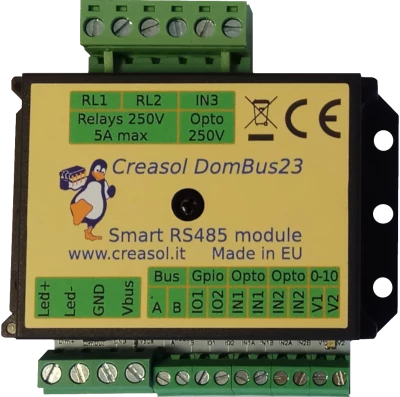
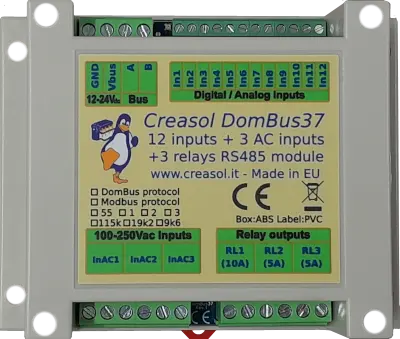
Versatile module with 230V inputs and outputs, and 5 low voltage I/Os.

  • 3x relays SPST 5A
  • 3x 115/230Vac optoisolated inputs
  • Single common for relays and AC inputs
  • 5x general purpose I/O, each one configurable as analog/digital inputs, pushbutton, counter, temperature and distance sensor.

DomBus33 - Module to domotize a light system using step relays

DomBus33 domotic module with 3 relay outputs that can control 3 lights Module designed to control 3 lights already existing and actually controlled by 230V pushbuttons and step-by-step relays. In this way each light can be activated by existing pushbuttons, and by the domotic controller.

  • 3x relays SPST 5A
  • 3x 115/230Vac optoisolated inputs
  • Single common for relays and AC inputs
  • 5x general purpose I/O, each one configurable as analog/digital inputs, pushbutton, counter, temperature and distance sensor.

Each relay can toggle the existing step-relay, switching the light On/Off. The optoisolator monitors the light status. The 5 I/Os can be connected to pushbuttons to activate or deactivate one or all lights.

DomBus36 - Domotic module with 12 relays

DomBus36 domotic module with 12 relay outputs 
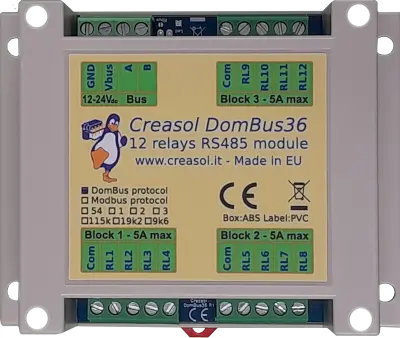
DIN rail module, low profile, with 12 relays outputs and very low power consumption.

  • 12x relays SPST 5A
  • Relays are grouped in 3 blocks, with a single common per block, for easier wiring
  • Only 12mW power consumption with all relays OFF
  • Only 750mW power consumption with all 12 relays ON !!

DomBus37 - 12 inputs, 3 115/230Vac inputs, 3 relay outputs

DomBus37 domotic module with 12 inputs, 3 AC inputs, 3 relay outputs Module designed to be connected to alarm sensors (magnetc contact sensors, PIRs, tampers): it's able to monitor mains power supply (power outage / blackout) and also have 3 relays outputs.

  • 12x low voltage inputs (analog/digital inputs, buttons, alarm sensors, balanced double/triple biased alarm sensors, counters, temperature and distance sensors, ...)
  • 3x 115/230Vac optoisolated inputs
  • 2x relays SPST 5A
  • 1x relay SPST 10A

DomBus38 - 4 SPDT 10A relays, 2 SPST 10A relays, 1 AC input, 12 low voltage inputs

DomBus38 domotic module with 12 inputs, 1 AC input, 6 relay outputs DIN rail module designed for burglar alarm system.

  • 4x relays SPDT (normally open + close contacts), 10A
  • 2x relays SPST 10A
  • 1x 115/230Vac optoisolated inputs, that can be used to monitor 230V voltage presence (blackout detector) and it's also used as zero-crossing detector to minimize in-rush current and overvoltage when a relay switches On/Off
  • 12x low voltage inputs (analog/digital inputs, buttons, alarm sensors, balanced double/triple biased alarm sensors, counters, temperature and distance sensors, ...)

DomBusTracker - Smart dual-axis sun tracker to optimize photovoltaic production

DomBusTracker domotic module that controls a dual-axis solar tracker motors DIN rail module that control azimuth + elevation/tilt motors of a sun tracker, to maximize photovoltaic energy production during the day and seasons.

  • Uses a deep-hole sun sensor, to optimize production with both sunny and cloudy weather
  • Works in stand-alone mode (no need for external controller)
  • Can be connected to Domoticz for monitoring and controlling the motors position

DomRelay2 - 2x relays board

Relay board with 2 relays, to be used with DomBus domotic modules 
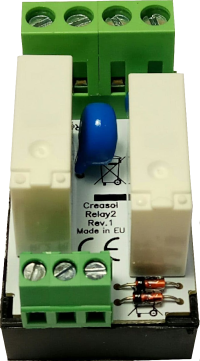
Simple module with 2 relays, to be used with DomBus modules or other electronic boards with open-collector or open-drain outputs

  • 2x 5A 12V SPST relays (Normally Open contact)
  • Overvoltage protection (for inductive loads, like motors)
  • Overcurrent protection (for capacitive laods, like AC/DC power supply, LED bulbs, ...)

DomESP1 / DomESP2 - Board with relays and more for ESP8266 NodeMCU WiFi module

Relay board for ESP8266 NodeMCU module 
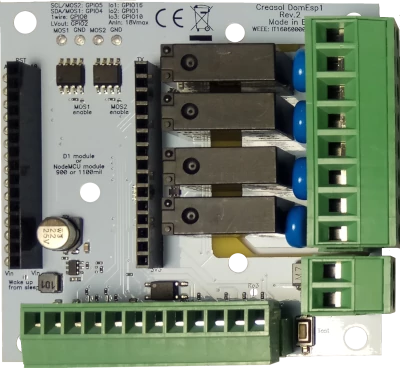
IoT board designed for NodeMCU v3 board using ESP8266 WiFi microcontroller

  • 9-24V input voltage, with high efficiency DC/DC regulator with 5V output
  • 4x SPST relays 5V with overvoltage protection
  • 1x SSR output (max 40V output)
  • 2x mosfet output (max 30V, 10A) for LED dimming or other DC loads
  • 1x I²C interface for sensors, extended I/Os and more)
  • 1x OneWire interface (DS18B20 or other 1wire sensors/devices)

OEM
smartopener

Commentaires

Votre commentaire

ouvre-porte de garage ou portail intelligent Wi-Fi

Ouvre-porte intelligent WiFi 2,4 GHz permettant d'ouvrir et de fermer votre porte de garage, votre portail ou votre barrière de circulation via smartphone, Android Auto, Google Home et Alexa.

Votre commentaire

Vous aimerez aussi

ouvre-porte de garage ou...

28,06 €