- -32%

Email: store@creasol.it - Telegram: CreasolTech - Whatsapp: +393283730010

Posta prioritaria: veloce ed economica - Corriere Espresso: veloce e sicuro

Contattaci prima di restituire i prodotti!
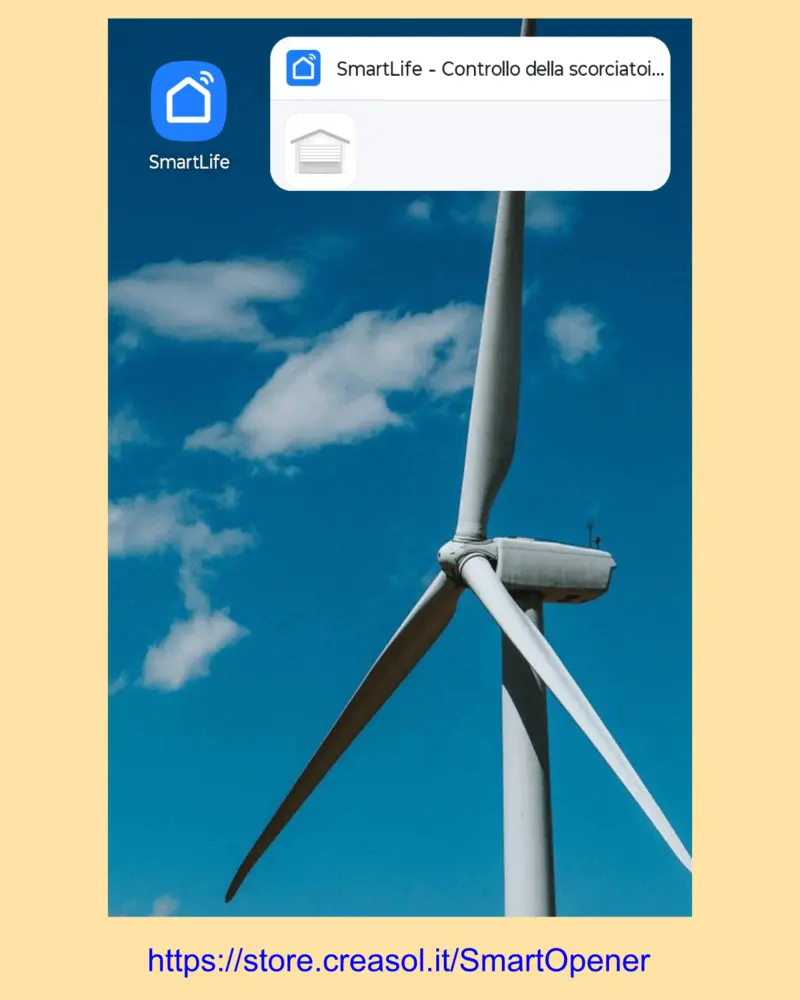
Apriporta intelligente WiFi da 2,4 GHz che consente di aprire e chiudere la porta del garage, il cancello o la barriera stradale tramite smartphone, Android Auto, Google Home e Alexa
Full support: molti prodotti sono stati progettati da noi!
Email: store@creasol.it - Telegram: CreasolTech - Whatsapp: +393283730010
Gli ordini vengono spediti entro 1 giorno lavorativo
Posta prioritaria: veloce ed economica - Corriere Espresso: veloce e sicuro
24 mesi di garanzia, reso/rimborso facile
Contattaci prima di restituire i prodotti!
 Dispositivo WiFi molto compatto, 39x39x23mm, dotato di un sensore magnetico per monitorare lo stato di chiusura e di un contatto pulito (relè) attivato per 0,5s per aprire/chiudere la porta del garage, il cancello o la barriera stradale (ora chiamata "automazione").
L'apriporta intelligente deve essere connesso alla rete WiFi domestica: lo smartphone potrà quindi aprire/chiudere l'automazione sia tramite la rete WiFi interna che tramite l'accesso a internet (cloud): in questo modo è possibile gestire l'automazione da remoto, al di fuori dell'area di copertura WiFi./p>
Nessun costo cloud, nessun canone annuale.
Attenzione all'elettricità. Tutte le operazioni devono essere eseguite da tecnici!
Ora l'automazione può essere controllata tramite smartphone e sistemi di domotica.
Sull'app SmartLife, crea una scena per aprire l'automazione (cancello, porta del garage o barriera stradale).
Quando lo smartphone è associato al veicolo, è possibile toccare l'icona App -> SmartLife -> Scenaper aprire l'automazione.
Naturalmente è possibile installare più dispositivi di apertura intelligenti per aprire diverse automazioni, ad esempio la porta del garage di casa, la barriera stradale sul posto di lavoro, ...
Utilizzo del plugin https://github.com/lacha07/domoticz-tuya-cloud è possibile registrarsi al cloud Tuya, accedendo all'apriporta intelligente in modo che possa essere gestito da Domoticz tramite browser (su PC o smartphone) e App.
Segui le istruzioni nel link sopra per registrarti all'API Tuya.
Installa l'integrazione Tuya, registrati al cloud Tuya per ottenere una chiave API, quindi potrai accedere agli apriporta intelligenti da Home Assistant.
No, è possibile evitare di installare il sensore magnetico: in questo caso è necessario disattivare le notifiche per lo stato aperto nell'app SmartLife/Tuya, per evitare avvisi sullo stato aperto dell'automazione.
Sì, ha una plastica staffa per il fissaggio su guida DIN, occupante 2,5 moduli (43 mm).
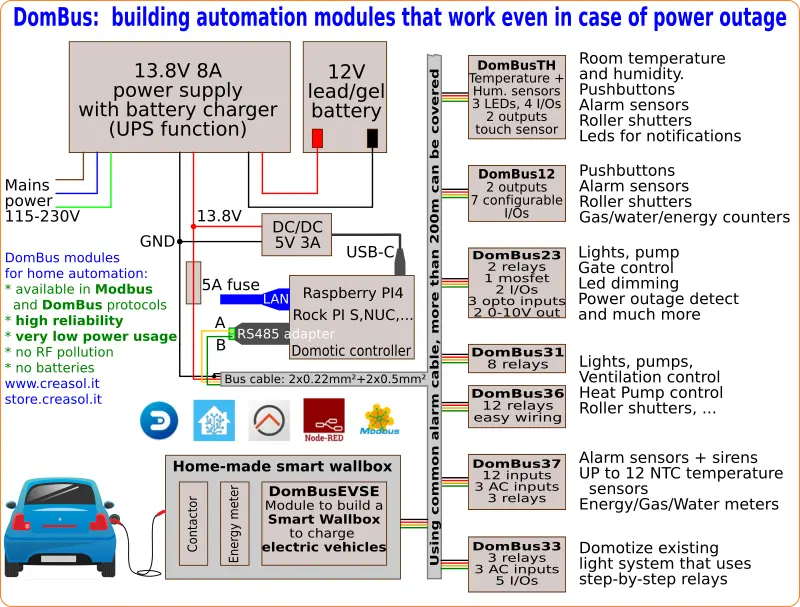
The following video shows a presentation of some domotic modules designed and produced in Italy by Creasol to make a reliable, easy and power-optimized home automation system.
The next video shows our Smart EVSE module that can be used to charge the electric car by using only solar power, or adding 25/50/75/100% of available power from the electrical grid.
Our industrial and home automation modules are designed to be
Modules are available in two version:
Store website - Information website
For our products we can offer FULL SUPPORT and CUSTOMIZATION: please contact us by Email or Telegram
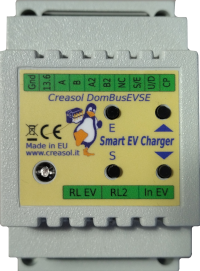 Complete solution to make a Smart EVSE, charging the electric vehicle using only energy from renewable source (photovoltaic, wind, ...), or adding 25-50-75-100% of available power from the grid.
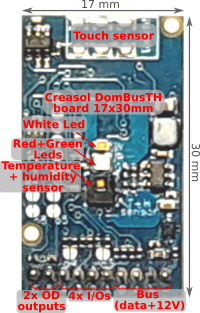 Compact board, 32x17mm, to be installed on blank cover with a 4mm hole in the middle, to exchange air for the relative humidity sensor. It can be installed in every room to monitor temperature and humidity, check alarm sensors, control blind motor UP/DOWN, send notifications (using red and green leds) and activate white led in case of power outage.
Includes:
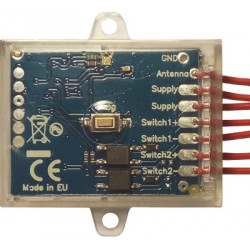
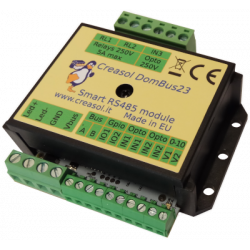
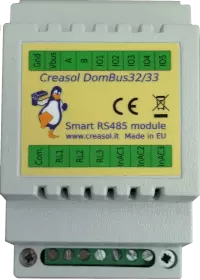
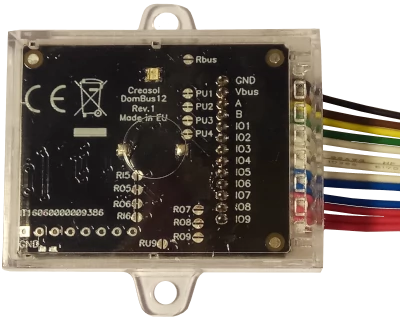 Very compact, versatile and cost-effective module with 9 ports. Each port can be configured by software as:
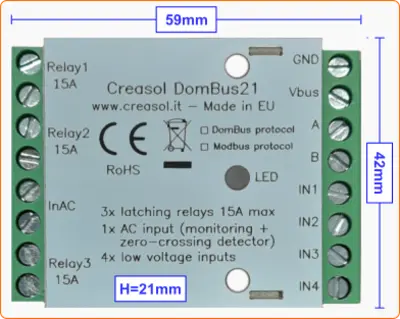 Very low power consumption module designed to enable up to 3 high power loads, up to 15A (3kW).
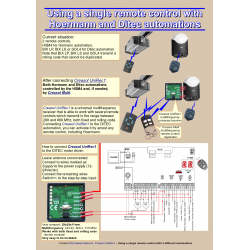
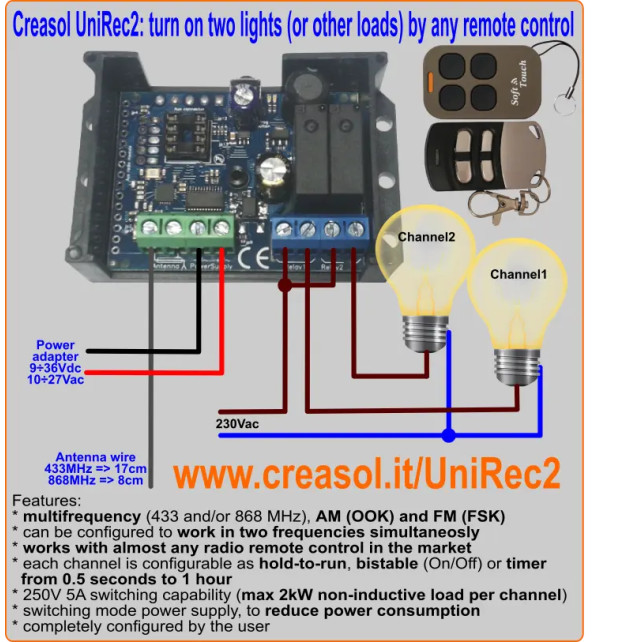
 Versatile module designed to control gate or garage door.
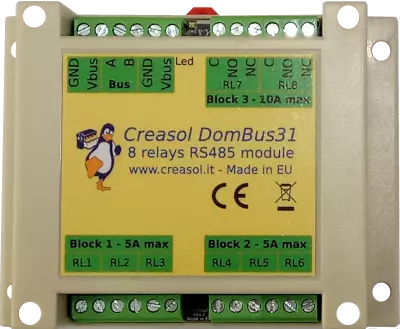 DIN rail low profile module, with 8 relays and very low power consumption:
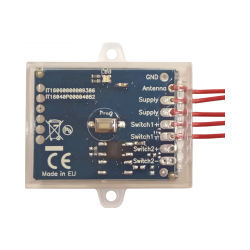
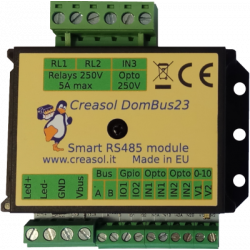
 Versatile module with 230V inputs and outputs, and 5 low voltage I/Os.
Module designed to control 3 lights already existing and actually controlled by 230V pushbuttons and step-by-step relays. In this way each light can be activated by existing pushbuttons, and by the domotic controller.
Each relay can toggle the existing step-relay, switching the light On/Off. The optoisolator monitors the light status. The 5 I/Os can be connected to pushbuttons to activate or deactivate one or all lights.
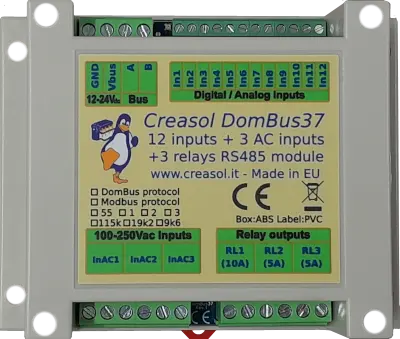
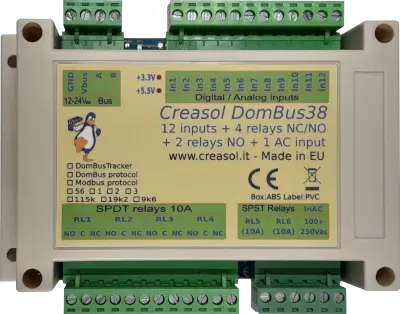
 DIN rail module, low profile, with 12 relays outputs and very low power consumption.
 Module designed to be connected to alarm sensors (magnetc contact sensors, PIRs, tampers): it's able to monitor mains power supply (power outage / blackout) and also have 3 relays outputs.
 DIN rail module designed for burglar alarm system.
![]() DIN rail module that control azimuth + elevation/tilt motors of a sun tracker, to maximize photovoltaic energy production during the day and seasons.
DIN rail module that control azimuth + elevation/tilt motors of a sun tracker, to maximize photovoltaic energy production during the day and seasons.
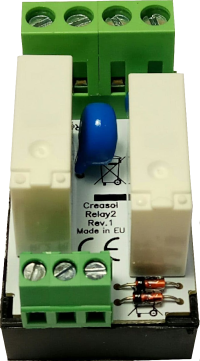 Simple module with 2 relays, to be used with DomBus modules or other electronic boards with open-collector or open-drain outputs
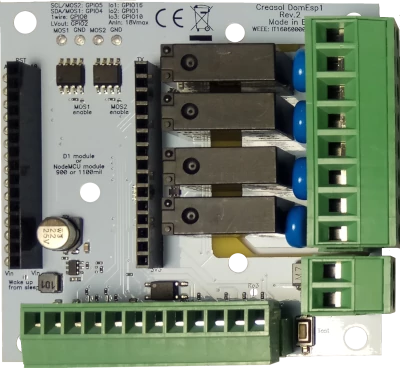 IoT board designed for NodeMCU v3 board using ESP8266 WiFi microcontroller
Deze garagedeur of poort opener werkt perfect en het aansluiten is een fluitje van een cent. Ik ga er binnenkort waarschijnlijk nog een bestellen!
Apriporta intelligente WiFi da 2,4 GHz che consente di aprire e chiudere la porta del garage, il cancello o la barriera stradale tramite smartphone, Android Auto, Google Home e Alexa