Email: store@creasol.it - Telegram: CreasolTech - Whatsapp: +393283730010

Priority mail: fast and cheap - Express Courier: fast and safe

Before returning products, please contact us
Portable charger for electric car, motorbike, van, WiFi working with Tuya/SmartLife app. Type2 cable 5m long, schuko, 6/8/10/13/16A selectable current, changeable by buttons, and changeable by smartphone/domotica even while charging
Full support: most products are designed by us!
Email: store@creasol.it - Telegram: CreasolTech - Whatsapp: +393283730010
Orders are shipped within 1 working day
Priority mail: fast and cheap - Express Courier: fast and safe
24 months warranty, easy return/refund in case of problem
Before returning products, please contact us
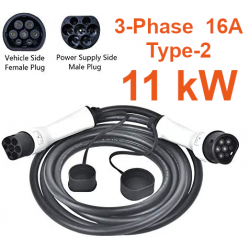
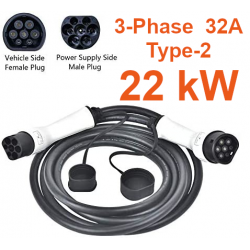
 Portable charger, single phase, that permits to connect to a schuko socket and charge the electric vehicle at the desired current, from 6 to 16 Amps (3.6kW max).
Charge at low current if you want to prevent overloading or want to use most energy from your photovoltaic in the hours and season when it produce a little power.
Increase the current (power) if you want to increase charging efficiency (minimizing dissipation in the On Board Charger, inside the vehicle), or if you want to reduce charging session time.
This charger have a WiFi transceiver that permits to monitor, start, stop and change the charging current from PC and smartphone, using the Smart Life or Tuya app. It may works also with home automation systems supporting Tuya protocol, like Home Assistant.
Current can be changed by your domotic system without the need to stop and start charging again!
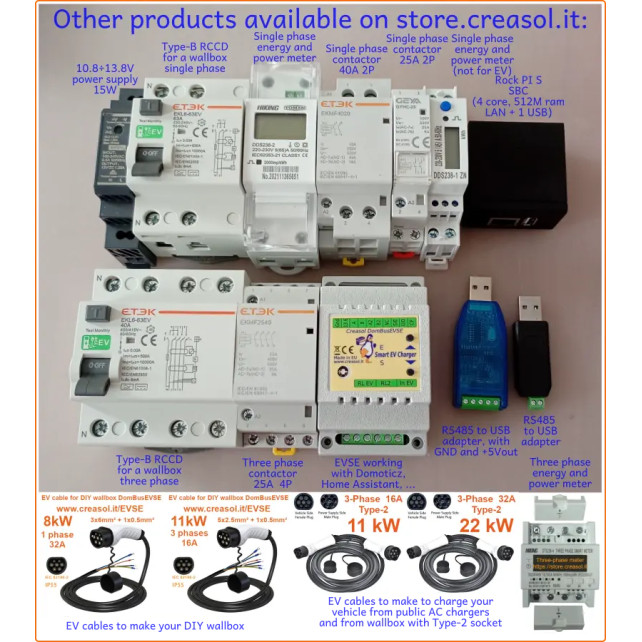
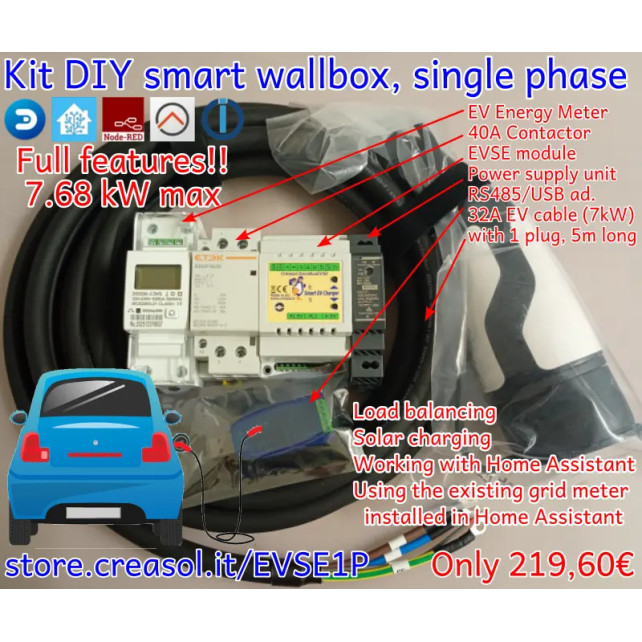
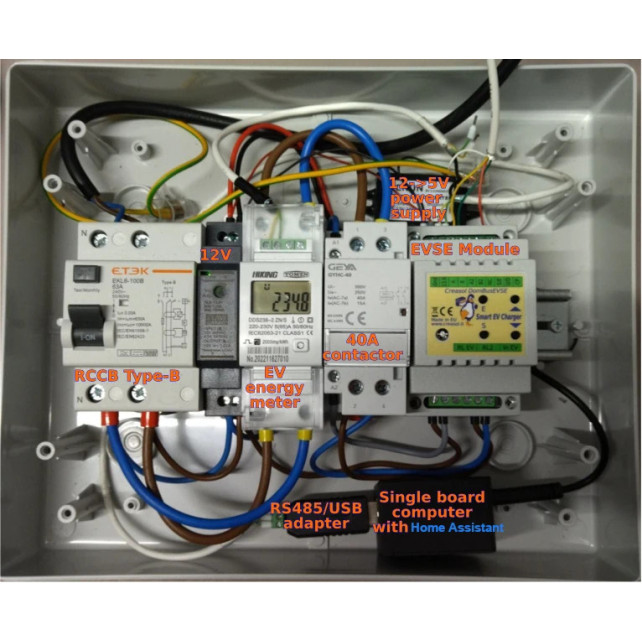
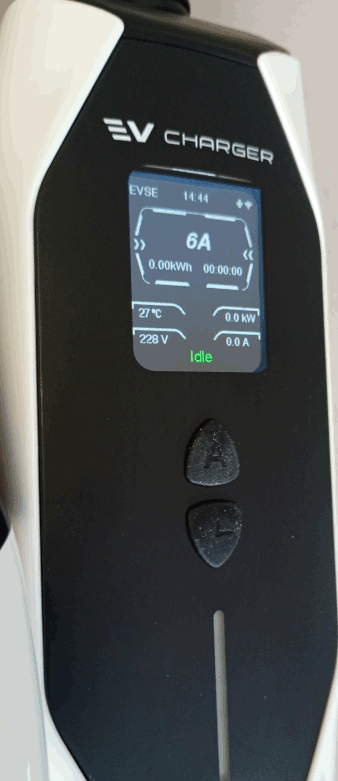
If you're looking for a real smart wallbox and you are a technician, with load balancing and solar charging, check our EVSE module to build a smart charging station by yourself working with Home Asisstant, Domoticz, NodeRED, OpenHAB, ioBroker and other systems supporting MQTT or Modbus protocols!
Warning: high charging power can lead to overheating on the schuko and connections: check with your electricians for the max allowed charging current, to prevent any fire and damage! Check cables and socket temperature the first time you use this product at maximum current supported by your electricity system (10A÷16A depending by your schuko socket and connections).
Certifications: CE, UKCA, RoHS, REACH, FCC
The EV charging device has undergone multiple circuit tests, IP65 proof rating,ensuring the safety and reliability of charging in all aspects,such as:Leakage current protection, impact resistance, over current protection, ground protection, surge protection, O/U voltage protection, O/U frequency protection,weather proof and over temp protection. Convenient charging service can be provided under any weather conditions.
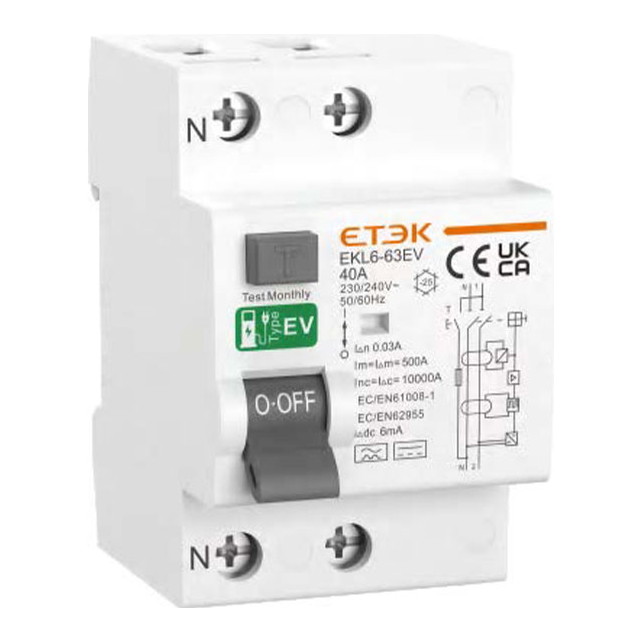
Residual current detection: Type A (30mA AC) and Type B(30mA AC+6mA DC)
About these, they have been awarded TÜV German Equipment and Product Safety Certification, CE/CB/UKCA/TUV-Mark certifications, and CE/REACH/RoHS test reports.
The portable charger is supplied with a plastic bracket that can be mounted on a wall by two screws. Install it near the schuko socket, possibly in a location covered by your WiFi network.
Assure that schuko socket is very good quality, supporting long sessions at 16A, as like as wires and connections: see warning message before! Do not connect the charger through a power extension cord!
Make sure that schuko soket is connected to the main electrical panel by a 16A circuit breaker.
Assure that the portable charger is supplied at 230V. Select the charging current by using the UP button. Connect the vehicle: the charging session should start normally.
Push and hold the DOWN button to stop charging: it will ask you to push DOWN button again as confirmation.
It's not possible to change the current by UP button while charging: this operation is possible only by App / Home automation
Set current to the max value supported by your system (schuko, connections, electricity contract), start charging and after 10 minutes stop charging, remove power to the schuko and check the temperature of schuko, connections, wires, ... to prevent overheating and fires.
Repeat the same checking after 60 minutes of charging at the max supported current.
Install the SmartLife app on your smartphone, open it, enable WiFi and Bluetooth, then tap on + sign to add a new device: on the portable charger, push and hold together UP+DOWN buttons, then push UP to select "reset WiFi", and push and hold UP button again to confirm: in few seconds you should see the "EVCharger" in your smartphone: set the SSID and password to let it connect to your WiFi network.
Smartphone app is really intuitive, no need for further explanations.
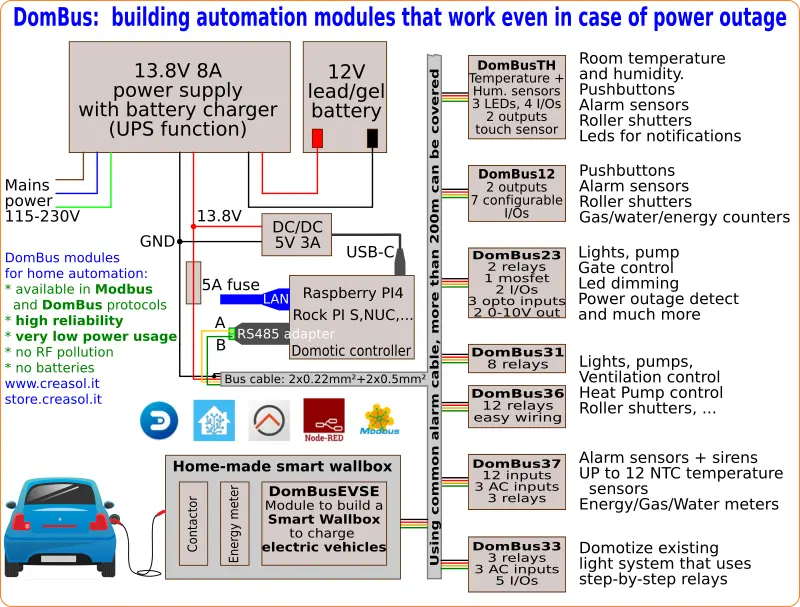
The following video shows a presentation of some domotic modules designed and produced in Italy by Creasol to make a reliable, easy and power-optimized home automation system.
The next video shows our Smart EVSE module that can be used to charge the electric car by using only solar power, or adding 25/50/75/100% of available power from the electrical grid.
Our industrial and home automation modules are designed to be
Modules are available in two version:
Store website - Information website
For our products we can offer FULL SUPPORT and CUSTOMIZATION: please contact us by Email or Telegram
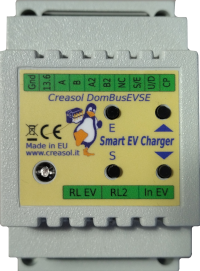 Complete solution to make a Smart EVSE, charging the electric vehicle using only energy from renewable source (photovoltaic, wind, ...), or adding 25-50-75-100% of available power from the grid.
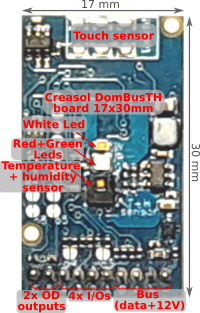 Compact board, 32x17mm, to be installed on blank cover with a 4mm hole in the middle, to exchange air for the relative humidity sensor. It can be installed in every room to monitor temperature and humidity, check alarm sensors, control blind motor UP/DOWN, send notifications (using red and green leds) and activate white led in case of power outage.
Includes:
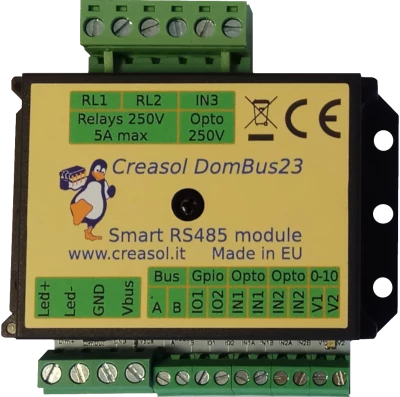
 Very compact, versatile and cost-effective module with 9 ports. Each port can be configured by software as:
 Very low power consumption module designed to enable up to 3 high power loads, up to 15A (3kW).
 Versatile module designed to control gate or garage door.
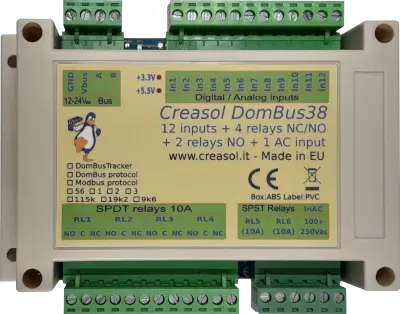
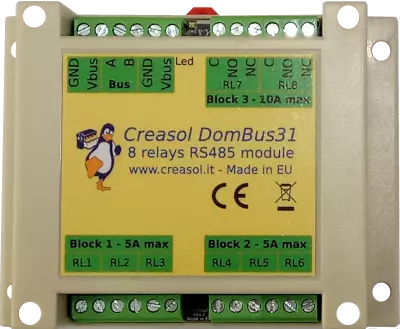 DIN rail low profile module, with 8 relays and very low power consumption:
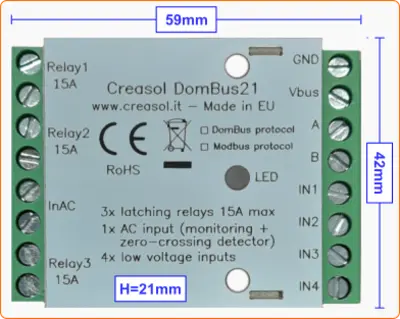
 Versatile module with 230V inputs and outputs, and 5 low voltage I/Os.
Module designed to control 3 lights already existing and actually controlled by 230V pushbuttons and step-by-step relays. In this way each light can be activated by existing pushbuttons, and by the domotic controller.
Each relay can toggle the existing step-relay, switching the light On/Off. The optoisolator monitors the light status. The 5 I/Os can be connected to pushbuttons to activate or deactivate one or all lights.
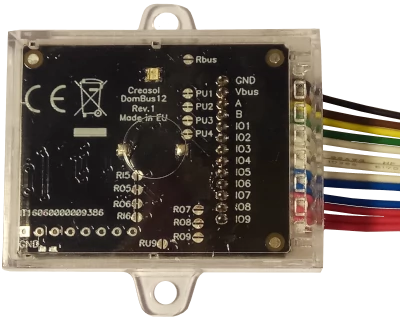
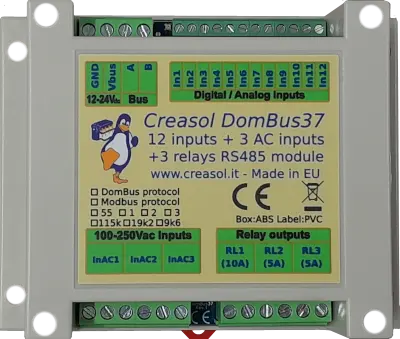
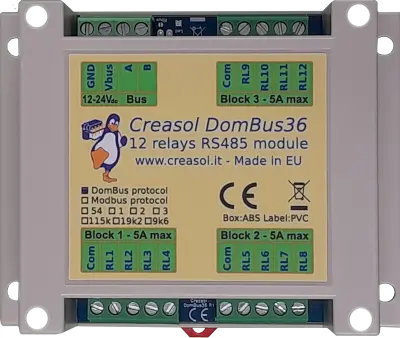 DIN rail module, low profile, with 12 relays outputs and very low power consumption.
 Module designed to be connected to alarm sensors (magnetc contact sensors, PIRs, tampers): it's able to monitor mains power supply (power outage / blackout) and also have 3 relays outputs.
 DIN rail module designed for burglar alarm system.
![]() DIN rail module that control azimuth + elevation/tilt motors of a sun tracker, to maximize photovoltaic energy production during the day and seasons.
DIN rail module that control azimuth + elevation/tilt motors of a sun tracker, to maximize photovoltaic energy production during the day and seasons.
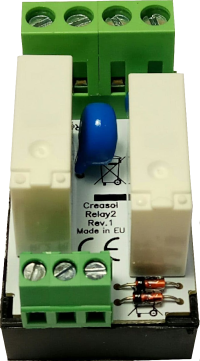 Simple module with 2 relays, to be used with DomBus modules or other electronic boards with open-collector or open-drain outputs
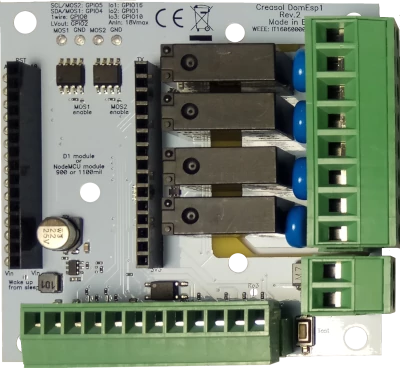 IoT board designed for NodeMCU v3 board using ESP8266 WiFi microcontroller
Portable charger for electric car, motorbike, van, WiFi working with Tuya/SmartLife app. Type2 cable 5m long, schuko, 6/8/10/13/16A selectable current, changeable by buttons, and changeable by smartphone/domotica even while charging